> ## Documentation Index
> Fetch the complete documentation index at: https://www.voiceflow.com/docs/llms.txt
> Use this file to discover all available pages before exploring further.
# Add the Voiceflow widget to WordPress
> Install Voiceflow’s chat widget on WordPress with WPCode or a small site plugin, choose its pages and test a visitor conversation.
## Overview
Install Voiceflow’s widget so visitors can ask your agent questions on WordPress. This guide covers public support using WPCode (**Studio**) or a site plugin (**Code**); both methods install the same widget.
**Note:**
**Building your own interface?** Custom chat and voice walkthroughs are [coming soon](#custom-interface). Start with [Chat agents](/docs/api-reference/agent-runtime/chat) or [Voice agents](/docs/api-reference/agent-runtime/voice) for the APIs.
New to Voiceflow? [Build a support agent](/docs/guides/usecases/customer-service/build-faq-agent) to create an agent, add your policies to Knowledge and publish it.
## Before you begin
Prepare your agent and WordPress access.
- Have a published agent and a question it can answer, such as your returns policy.
- Use a staging site first. You or your WordPress administrator need permission to install plugins.
- If someone else manages the site, send them the snippet, target pages and a test question. Ask for the published test URL.
| WordPress setup | Requirement |
| --- | --- |
| Self-hosted | Plugin installation access and a theme that renders footer scripts. |
| WordPress.com | A Personal, Premium, Business or Commerce plan with hosting features activated. Free sites do not support this installation. |
See WordPress.com’s [code installation](https://wordpress.com/support/adding-code-to-headers/) and [hosting activation](https://wordpress.com/support/activate-your-plan/) requirements. Use the generated widget client key in browser code; keep personal and service API keys on your backend.
## Install the widget
Connect your published agent to the website.
#### Studio
### 1. Copy your widget snippet
Open your project in [Agent studio](https://creator.voiceflow.com). Select **Widget → Installation** and copy the complete snippet, including its script tags.
Widget Installation panel with the generated snippet and copy control — Copy the installation code from your Voiceflow project.
### 2. Add it to WordPress
In WordPress, open **Plugins → Add New Plugin**. Find **WPCode**, then choose **Install Now** and **Activate**. If your site already has a footer-script manager, use that instead.
Open **Code Snippets → Header & Footer**. Paste the snippet into **Footer**, keeping any unrelated code.
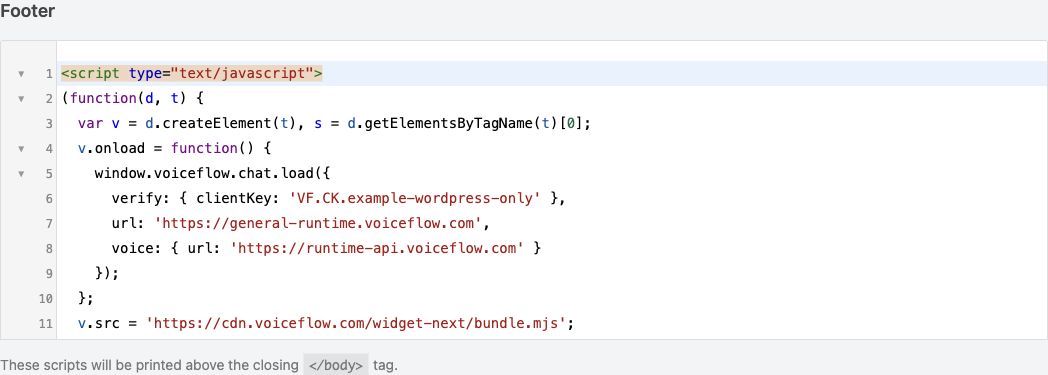
See [WPCode's header/footer instructions](https://wpcode.com/docs/using-the-global-header-footer-settings/) for its field settings.
### 3. Save the installation
Choose **Save Changes**, clear the page cache if enabled, and open your site. The widget launcher should appear. Continue with [Test a visitor conversation](#test-conversation).
Install the widget once. A second copy in your theme, builder or another plugin can initialize it twice.
#### Code
Use this plugin for the default floating widget whose generated configuration contains `verify.clientKey`. It stays separate from your theme.
### 1. Create the plugin
Create `voiceflow-widget/voiceflow-widget.php`. Replace `YOUR_WIDGET_CLIENT_KEY` with **`verify.clientKey` from Widget → Installation**, supplied by the Voiceflow project owner.
```php
array('clientKey' => 'YOUR_WIDGET_CLIENT_KEY'),
'url' => 'https://general-runtime.voiceflow.com',
'voice' => array('url' => 'https://runtime-api.voiceflow.com'),
);
wp_add_inline_script(
$handle,
'window.voiceflow.chat.load(' . wp_json_encode($config) . ');',
'after'
);
});
```
The example uses the standard runtime URLs shown above. For a generated snippet using `verify.projectID`, a different environment or embedded `render` configuration, use the complete generated snippet in a footer manager instead of this plugin example. The [widget environment reference](/docs/documentation/deploy/widget/web-chat-api#choosing-which-environment-the-widget-loads) explains release selection.
WordPress [queues the loader](https://developer.wordpress.org/reference/functions/wp_enqueue_script/) in the footer and [prints the initializer after it](https://developer.wordpress.org/reference/functions/wp_add_inline_script/). Keep that order; adding `async` or `defer` requires a different readiness mechanism.
### 2. Upload and activate
Zip the `voiceflow-widget` folder. In WordPress, choose **Plugins → Add New Plugin → Upload Plugin**, upload it, then activate **Site Voiceflow Widget**. You can also deploy the folder to `wp-content/plugins/` through your normal site deployment.
Use this plugin as the site's only Voiceflow installation.
### 3. Check the output
Clear the page cache and open a public page. In its source, find `site-voiceflow-widget-js` followed by the initializer. Continue with [Test a visitor conversation](#test-conversation).
## Choose widget appearance and pages
Match the supplied widget to your site and control where it appears.
#### Studio
1. In Voiceflow's **Widget** settings, choose your launcher, colors, icon and interface options, then [publish the changes](/docs/documentation/deploy/environments/publishing).
2. Open the WordPress site to check the result. WPCode's global Footer applies across the site.
For selected pages, send your WordPress developer the included and excluded URLs. Ask them to replace the global snippet with a scoped installation and return those URLs for testing.
#### Code
1. Ask the Voiceflow owner to publish the widget appearance, or use the supported [widget customization options](/docs/documentation/deploy/widget/custom-web-chat-styling).
2. To limit this plugin to selected WordPress Pages, add the following inside its `wp_enqueue_scripts` callback, before `$handle`:
```php
if (!is_page(array('support', 'contact'))) {
return;
}
```
Replace `support` and `contact` with your page slugs or IDs. [`is_page()`](https://developer.wordpress.org/reference/functions/is_page/) matches Pages; other content types need the corresponding WordPress condition. Deploy the change before testing an included and excluded URL.
## Handle identity and sessions
Keep public widget conversations separate from customer accounts.
This installation provides public support. A WordPress login or client-supplied user ID does not authorize the agent to access customer records.
| Event | Required behavior |
| --- | --- |
| First visit | Test the widget’s guest conversation without relying on WordPress account details. |
| Navigation or reload | Initialize the widget once per document. Check whether a returning visitor retains or starts a conversation under your retention policy. |
| Sign-out or account change | If you add account-aware support, reset the prior conversation and revoke the backend session as appropriate. Authorize protected operations on every request. |
The widget does not automatically identify WordPress or WooCommerce customers. Order access needs a separate [WooCommerce integration](/docs/guides/integrations/woocommerce/overview) and backend authorization. Clearing the visible messages alone does not establish an account boundary.
## Test a visitor conversation
Check the reply through the installed WordPress widget.
### 1. Open the public page
Use a logged-out browser window. Open the widget on the published WordPress page, rather than the editor or Voiceflow’s Run panel.
### 2. Ask a question and follow-up
Send your prepared policy question, then a related follow-up. Check both widget replies against the agent’s Knowledge and instructions.
### 3. Check sessions and page coverage
Find the exchange in [Transcripts](/docs/documentation/measure/transcripts) to confirm the intended project. Test relevant layouts, including Elementor, Divi or WooCommerce pages. For scoped widget placement, check that excluded pages have no launcher. Verify your [session policy](#identity-sessions) after navigation and account changes.
### The script is missing
Check the saved installation, cache and footer output.
Confirm that WPCode saved **Footer** or that your plugin is active. Clear the page cache. For a custom theme, ask its developer to check [`wp_footer()`](https://developer.wordpress.org/reference/functions/wp_footer/). On WordPress.com, check the hosting requirements above.
### The widget does not appear
Inspect blocked scripts and duplicate installations.
Check Console and Network for a failed `cdn.voiceflow.com` request. Have the site owner review relevant consent or script-optimization rules and remove duplicate widget installations.
### The agent gives no answer or the wrong answer
Check the published agent and installed widget configuration.
Compare the installed client key and environment with the generated snippet. Check the release and Transcripts. Missing policy or product answers belong in the agent’s Knowledge and instructions.
### It works only for administrators
Compare the page delivered to logged-out visitors.
Inspect the logged-out page's HTML and browser errors. Check whether caching, page conditions or consent changes the delivered script. Correct the rule, clear the affected cache and repeat the [visitor test](#test-conversation).
## Release the widget
Publish the widget installation on your production WordPress site.
#### Studio
1. Publish the reviewed agent and widget settings in Voiceflow.
2. Save the snippet on the production WordPress site and clear its page cache.
3. Repeat the [visitor test](#test-conversation) on the production URL.
### Update or remove the widget
Maintain the footer snippet after launch.
Publish later agent or appearance changes in Voiceflow. Replace the WordPress snippet if its generated installation details change.
To remove the widget, delete only its script from **Footer**, save and clear the page cache. Check that the launcher is gone.
#### Code
1. Have the Voiceflow owner publish the reviewed agent and widget settings.
2. Deploy and activate the plugin with the production project's widget client key; clear the page cache.
3. Repeat the [visitor test](#test-conversation) on the production URL.
### Update or remove the widget
Maintain the site plugin after launch.
Keep the plugin in version control. Update its configuration when the generated installation details change.
To remove it, deactivate **Site Voiceflow Widget** and clear the page cache. Check that the script and launcher are gone.
## Custom interface guides
Planned WordPress guides for your own chat or voice UI.
WordPress walkthroughs for custom chat and voice interfaces are **coming soon**. These are separate from this widget guide.
| Planned guide | API reference |
| --- | --- |
| Add custom chat | [Chat agents](/docs/api-reference/agent-runtime/chat) |
| Add custom voice | [Voice agents](/docs/api-reference/agent-runtime/voice) |