Step 1: Define your goals
The most important part of setting up tests is knowing what to test.
There are three guiding questions to ask:
- Why did we create this conversational assistant?
- What are the important metrics I want to track?
- What part of the current testing process is painful?
Every assistant is different, so it’s important to have a clear product definition to start. Here’s an example for Voiceflow Pizza:
Vision: Create the best pizza ordering experience
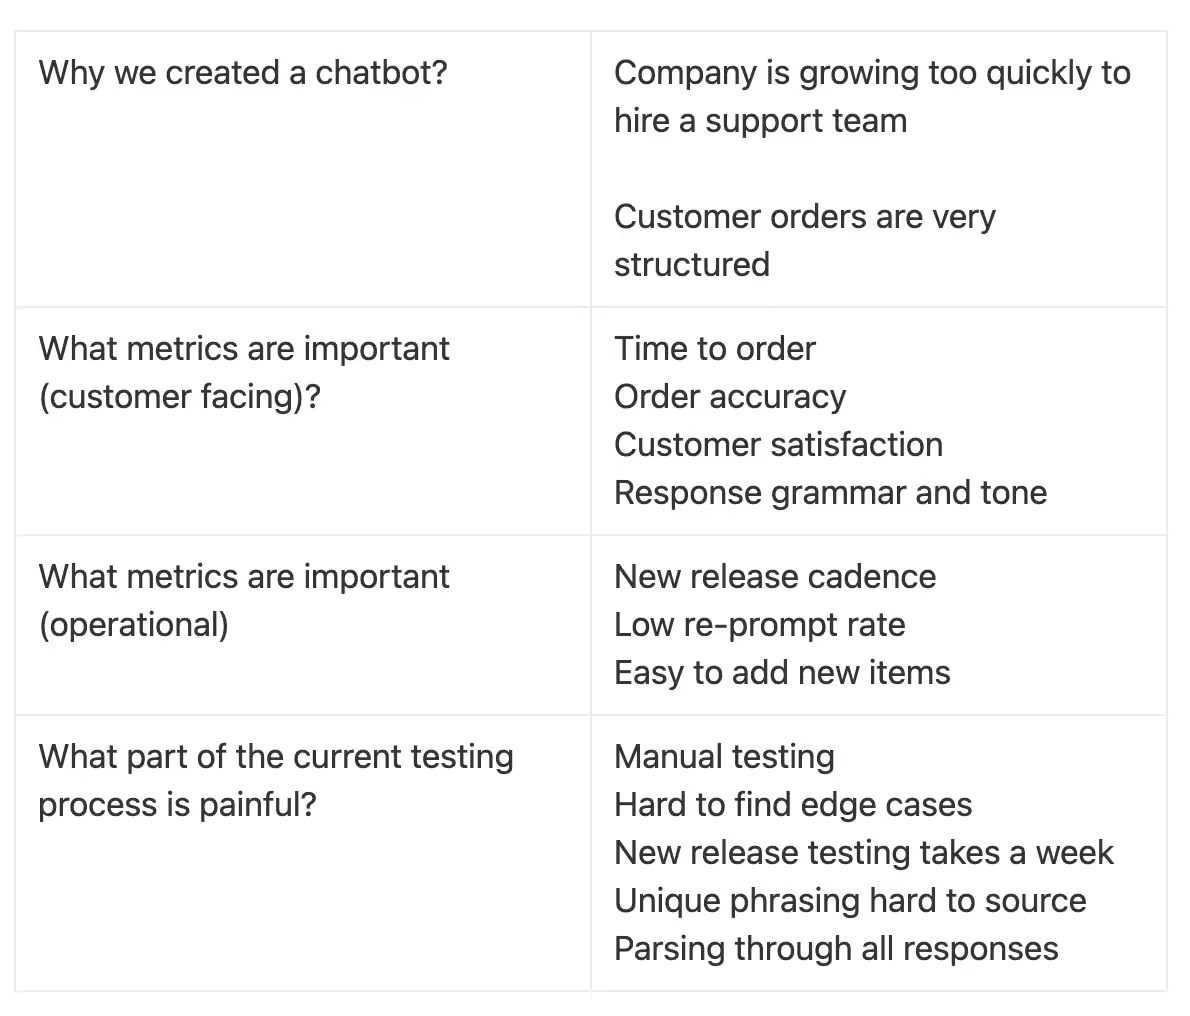
After defining our goals and pain points, we have a clear direction on why we need testing and why we need automated testing for our chatbot.
Step 2: Create and prioritize your use cases
From our previous list, Voiceflow Pizza’s PM has pulled the data, and the signs are showing that improving release times and testing user order phrasing will provide the best ROI.
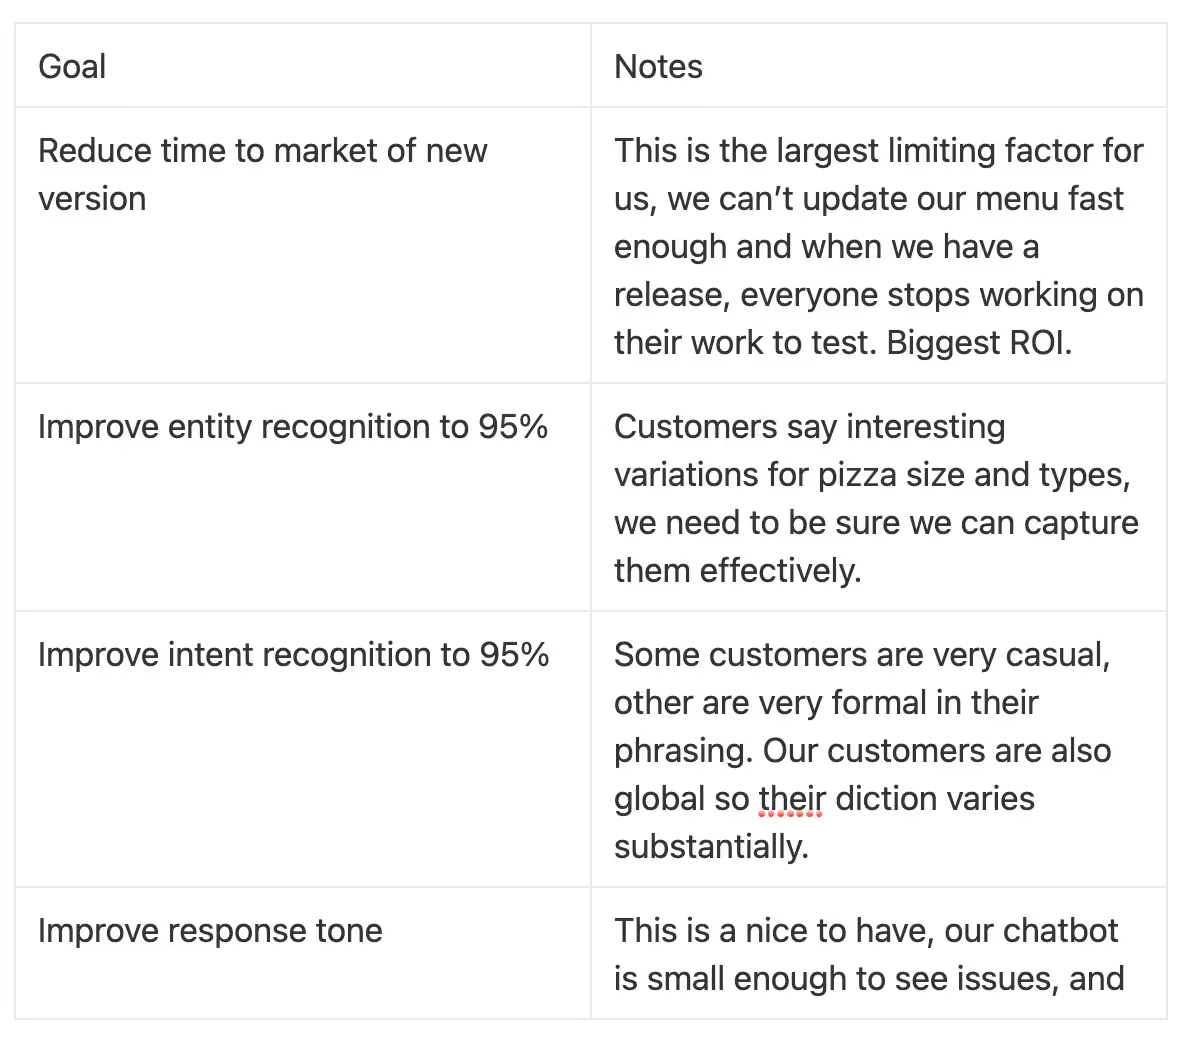
The top three priority items focus on improving the NLU model and testing speed, so we’ll put the other items in the backlog.
Choosing test types
For testing a conversational AI, there are usually four types of tests you can run.
- Intent testing
- Entity testing
- Response testing
- Flow testing (end to end)
In this case, we’ll be focusing on Intent Testing and Entity Testing.
Let’s now define our use cases.
Step 3: Create your tests
We’ve decided on the types of testing we want to do, let’s start creating our test cases!
There are four main ways to source test cases:
- Team brainstorming
- User testing results
- Production results
- ML generation
In this case we’ll focus on brainstorming and user testing data since they are the easiest to acquire. After brainstorming and reviewing existing data, 100 use cases were created. The top 3 were:

In an ideal world, each test case justifies a scenario or previous mistake, but language models are more complicated to always justify why they exist. We can add them to our test case with a basic comment on why they are there.
We can also add them to our training set if they are frequent enough. It breaks the train/test split that is recommended in data science, but in practice this is creating a rule set for your model to follow that’s effective in practice.
After selecting our test cases, we can embed them either as code, a configuration file or within a UI, depending how your tests are being run. For the following examples, we’ll use examples embedded in code, with some python functions wrapping them.
Step 4: Run your tests
To start this section, we’ll use generic terms and functions to demonstrate the approach.

In the above example, we load our test_cases and their expected values, run them through the NLU and check that the results match - pretty straight forward.
However, most NLUs don’t have built in functionality to run tests, so we have to write our own wrapper code, which we’ll cover in the this section. If you not familiar with code, you can skip the rest of this section, or read it as an opportunity to learn something new.
Approach
We’ll split this section into a general interface portion, and a Voiceflow specific implementation. If you just want the code, you can find it here.
Interface
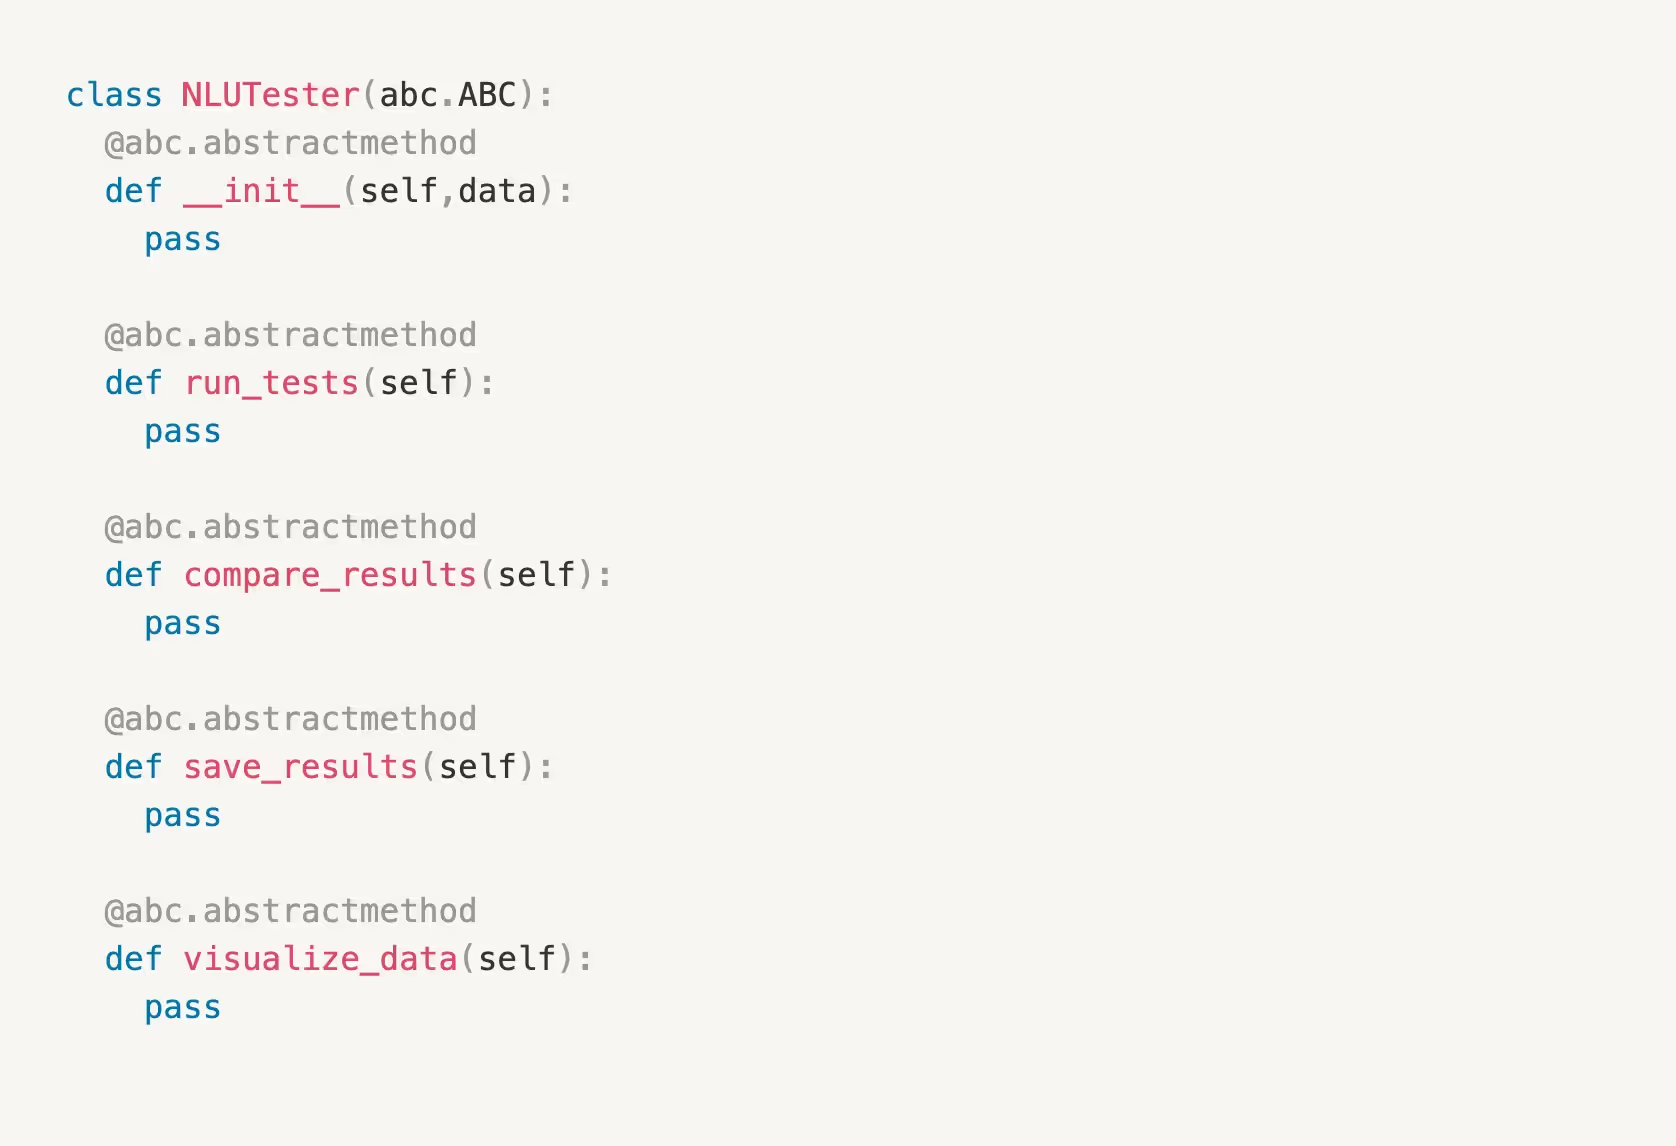
Implementation and running the code

To run the code you just need your dialogue manager key and a python environment. Once you clone the Github repository, the readme will update the steps on how to do so.
Full code for Voiceflow implementation
You can find the full code in this GitHub repo.
We skipped over the details of some of the implementation for Voiceflow, including:
- Creating a project
- Uploading training data
- Running tests
The all of these steps and files are defined in the GitHub repo if you’d like more details.
Step 5: Integrate with your CAI workflow
We wrote and ran our tests! Now what?
Every team’s workflow and testing maturity is different, but we recommend that you run your tests whenever you make major changes to your NLU. These can include:
- adding a new intent
- adding new utterances
- before releasing your project for user testing
- after conducting user testing to update your test cases
- before a release
- before a new product design
Basic testing pipeline
You can run your tests from a local python environment, but as you get into a more mature environment it usually makes sense to integrate the test process with your general CI/CD pipeline.
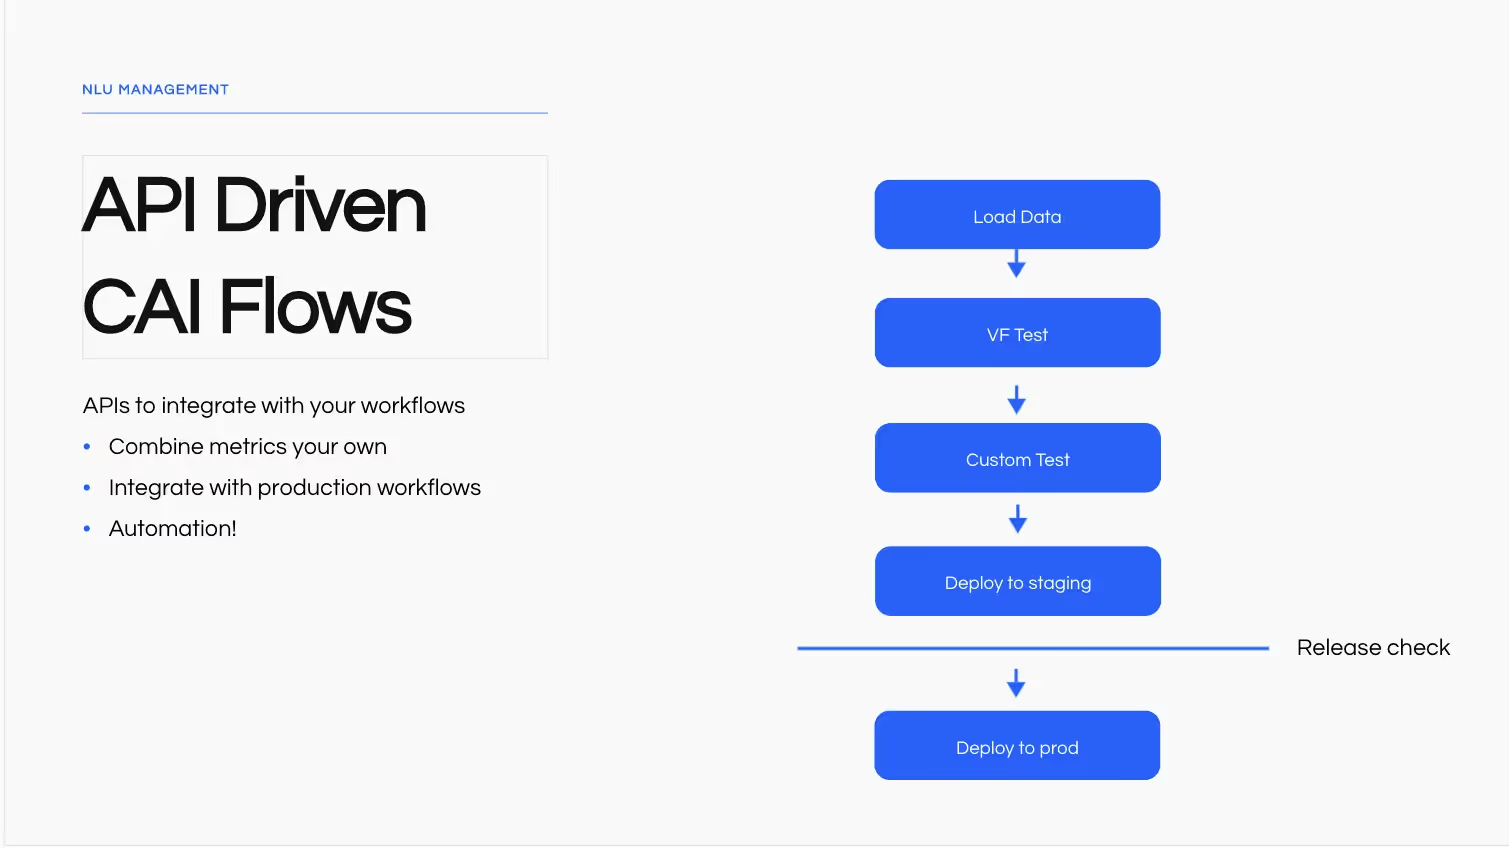
Depending on where CAI falls, this might be a pure application testing function a data engineering function, or MLOps function.
Since the test cases we covered are generic and likely rest based, you have lots of flexibility for the implementation.
Conclusion
Today we covered five key steps on how to test your NLU:
- Define your goals
- Create & prioritize use cases
- Create your tests
- Run your tests
- Integrate with your CAI workflow.
We started from a general and business approach and concluded with more of a technical implementation. In future articles we’ll cover other forms of testing, along with how to do this in a no code environment.
Ready to chat optimize your NLU strategy and model? Chat with our team.
Step 1: Define your goals
The most important part of setting up tests is knowing what to test.
There are three guiding questions to ask:
- Why did we create this conversational assistant?
- What are the important metrics I want to track?
- What part of the current testing process is painful?
Every assistant is different, so it’s important to have a clear product definition to start. Here’s an example for Voiceflow Pizza:
Vision: Create the best pizza ordering experience

After defining our goals and pain points, we have a clear direction on why we need testing and why we need automated testing for our chatbot.
Step 2: Create and prioritize your use cases
From our previous list, Voiceflow Pizza’s PM has pulled the data, and the signs are showing that improving release times and testing user order phrasing will provide the best ROI.

The top three priority items focus on improving the NLU model and testing speed, so we’ll put the other items in the backlog.
Choosing test types
For testing a conversational AI, there are usually four types of tests you can run.
- Intent testing
- Entity testing
- Response testing
- Flow testing (end to end)
In this case, we’ll be focusing on Intent Testing and Entity Testing.
Let’s now define our use cases.
Step 3: Create your tests
We’ve decided on the types of testing we want to do, let’s start creating our test cases!
There are four main ways to source test cases:
- Team brainstorming
- User testing results
- Production results
- ML generation
In this case we’ll focus on brainstorming and user testing data since they are the easiest to acquire. After brainstorming and reviewing existing data, 100 use cases were created. The top 3 were:

In an ideal world, each test case justifies a scenario or previous mistake, but language models are more complicated to always justify why they exist. We can add them to our test case with a basic comment on why they are there.
We can also add them to our training set if they are frequent enough. It breaks the train/test split that is recommended in data science, but in practice this is creating a rule set for your model to follow that’s effective in practice.
After selecting our test cases, we can embed them either as code, a configuration file or within a UI, depending how your tests are being run. For the following examples, we’ll use examples embedded in code, with some python functions wrapping them.
Step 4: Run your tests
To start this section, we’ll use generic terms and functions to demonstrate the approach.

In the above example, we load our test_cases and their expected values, run them through the NLU and check that the results match - pretty straight forward.
However, most NLUs don’t have built in functionality to run tests, so we have to write our own wrapper code, which we’ll cover in the this section. If you not familiar with code, you can skip the rest of this section, or read it as an opportunity to learn something new.
Approach
We’ll split this section into a general interface portion, and a Voiceflow specific implementation. If you just want the code, you can find it here.
Interface

Implementation and running the code

To run the code you just need your dialogue manager key and a python environment. Once you clone the Github repository, the readme will update the steps on how to do so.
Full code for Voiceflow implementation
You can find the full code in this GitHub repo.
We skipped over the details of some of the implementation for Voiceflow, including:
- Creating a project
- Uploading training data
- Running tests
The all of these steps and files are defined in the GitHub repo if you’d like more details.
Step 5: Integrate with your CAI workflow
We wrote and ran our tests! Now what?
Every team’s workflow and testing maturity is different, but we recommend that you run your tests whenever you make major changes to your NLU. These can include:
- adding a new intent
- adding new utterances
- before releasing your project for user testing
- after conducting user testing to update your test cases
- before a release
- before a new product design
Basic testing pipeline
You can run your tests from a local python environment, but as you get into a more mature environment it usually makes sense to integrate the test process with your general CI/CD pipeline.

Depending on where CAI falls, this might be a pure application testing function a data engineering function, or MLOps function.
Since the test cases we covered are generic and likely rest based, you have lots of flexibility for the implementation.
Conclusion
Today we covered five key steps on how to test your NLU:
- Define your goals
- Create & prioritize use cases
- Create your tests
- Run your tests
- Integrate with your CAI workflow.
We started from a general and business approach and concluded with more of a technical implementation. In future articles we’ll cover other forms of testing, along with how to do this in a no code environment.
Ready to chat optimize your NLU strategy and model? Chat with our team.



.svg)