Voiceflow named a 2026 Best Software Award winner by G2
Read now


If you’ve never built a Messenger bot before, you’re in exactly the right spot. In this step-by-step guide, I’ll show you how to set up a fully functional AI agent for your business’s Facebook Messenger DMs, even if you have zero technical experience.
My name is Alex, co-founder of Parnidia, an AI development agency. We’ve launched 15+ chatbots for all kinds of businesses, and today, I’ll show you the fastest way to build your own Messenger automation—using simple, no-code tools.
What you’ll need (all free to start):
Why Voiceflow?
Voiceflow lets you easily build all kinds of conversational agents—no coding required. It’s extremely flexible, has a supportive community, and is perfect for both beginners and pros who want to quickly launch chatbots for any business need.
Why Convocore?
Convocore makes it simple to connect your Voiceflow agent directly to your Facebook page. It handles the integration, so your AI assistant can start chatting with Messenger users instantly.
By the end, you’ll have a working Messenger bot ready to handle real customer questions—and you’ll understand each step along the way. No coding, no technical jargon—just real automation, fast.
Let’s get started.
In this practical guide, we’ll create a fitness coach agent that educates users about a coaching program and helps generate sales—all inside Facebook Messenger. The process is simple, actionable, and focused on real business outcomes. If you want to stop wasting time on manual DMs and start turning Messenger into an automated sales and support channel, this is exactly what you’re looking for.
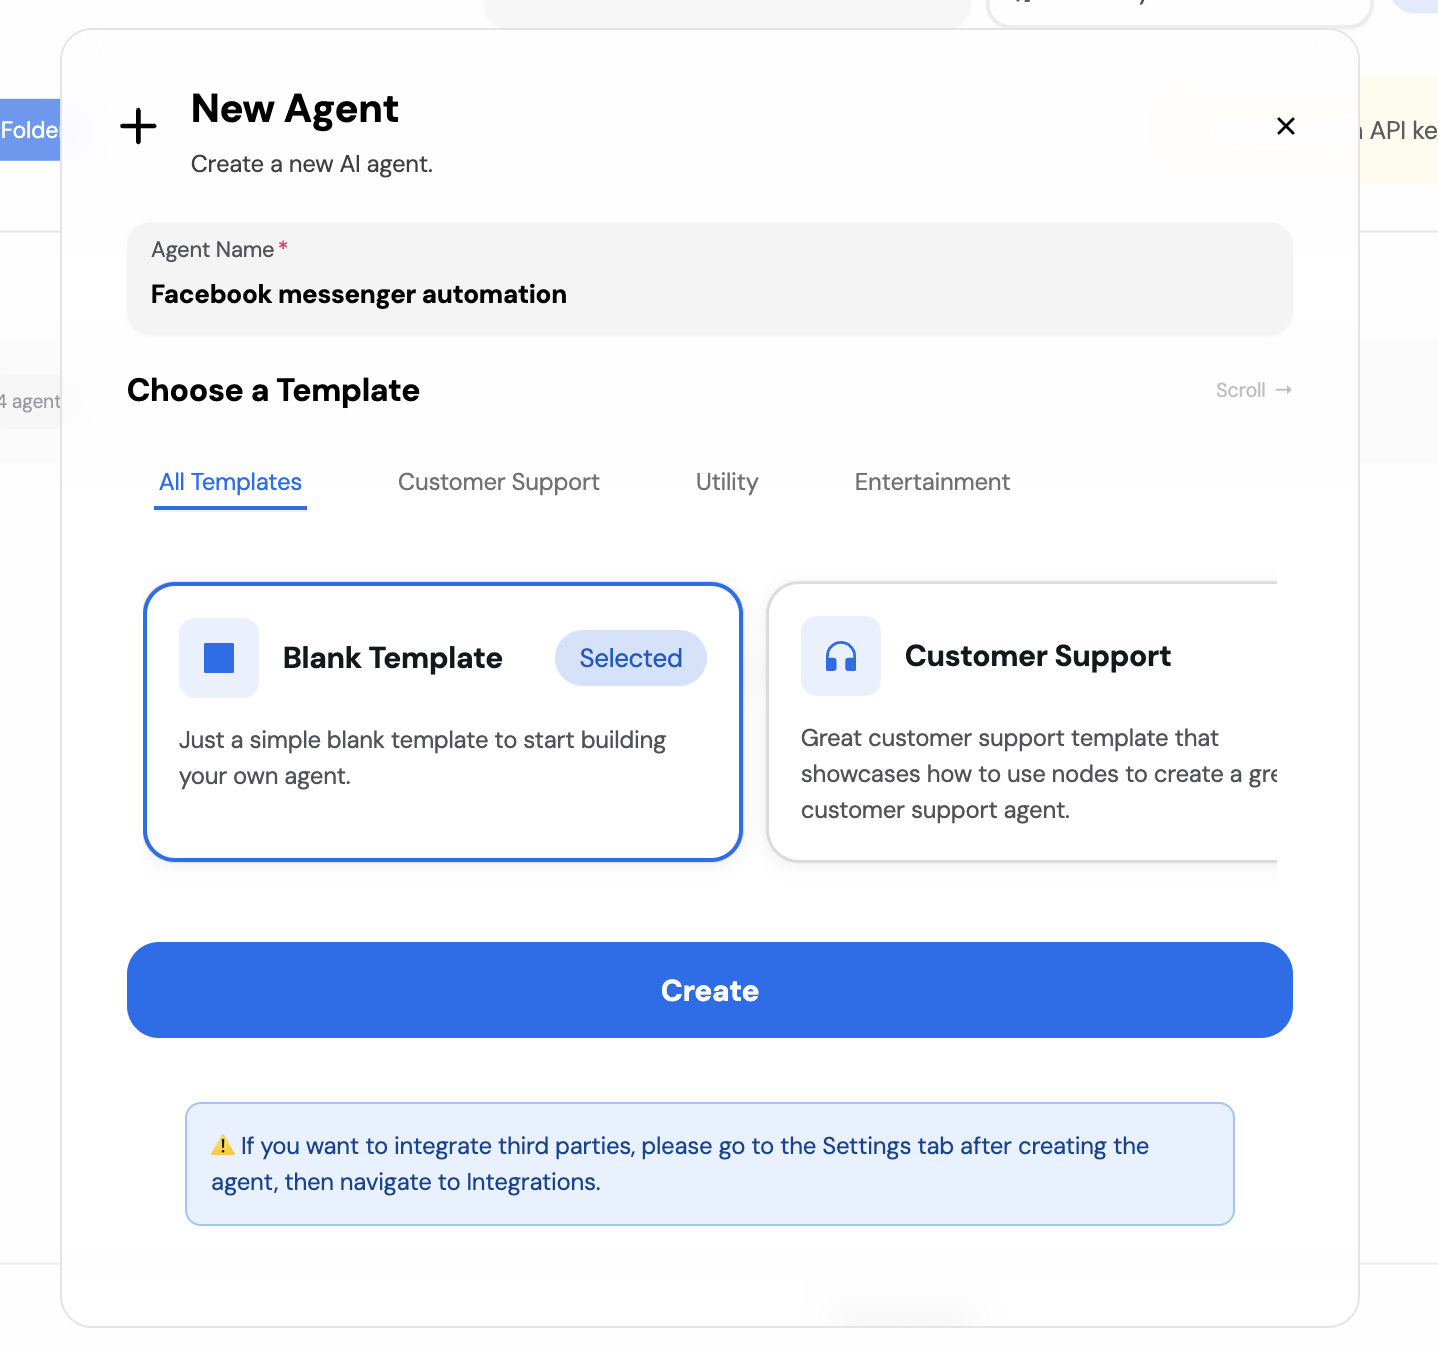
Let’s start from the fun part, seeing our first automated message on our business page. First we need to create a new Voiceflow project that we’ll connect to a Facebook business page. Give it a name and select “Basic template” - we’ll customize the agent workflow later. For learning how to automate our first message, a basic template is enough (Image 1).

After we’ve created the project, we’ll need to publish it, for us to be able to connect it with Convocore. At the top right corner of your Voiceflow canvas, you’ll see a big green button “Publish”, click it, and click “Publish” again (Image 2).

Next, go to Convocore and create a new account if you don’t have one. You’ll have to create an agen with a basic template, that we’ll connect to Voiceflow and Facebook messenger (Image 3).
With new agent created:

Now, back in the “Widget” tab, you’ll see a section where you need to enter Voiceflow project ID and API key (Image 5).

You can find it by going to Voiceflow and navigating to Interface. In the Widget tab, you’ll see a code snippet with your project ID (Image 6), and an API Keys tab where you can get your API key (Image 7).

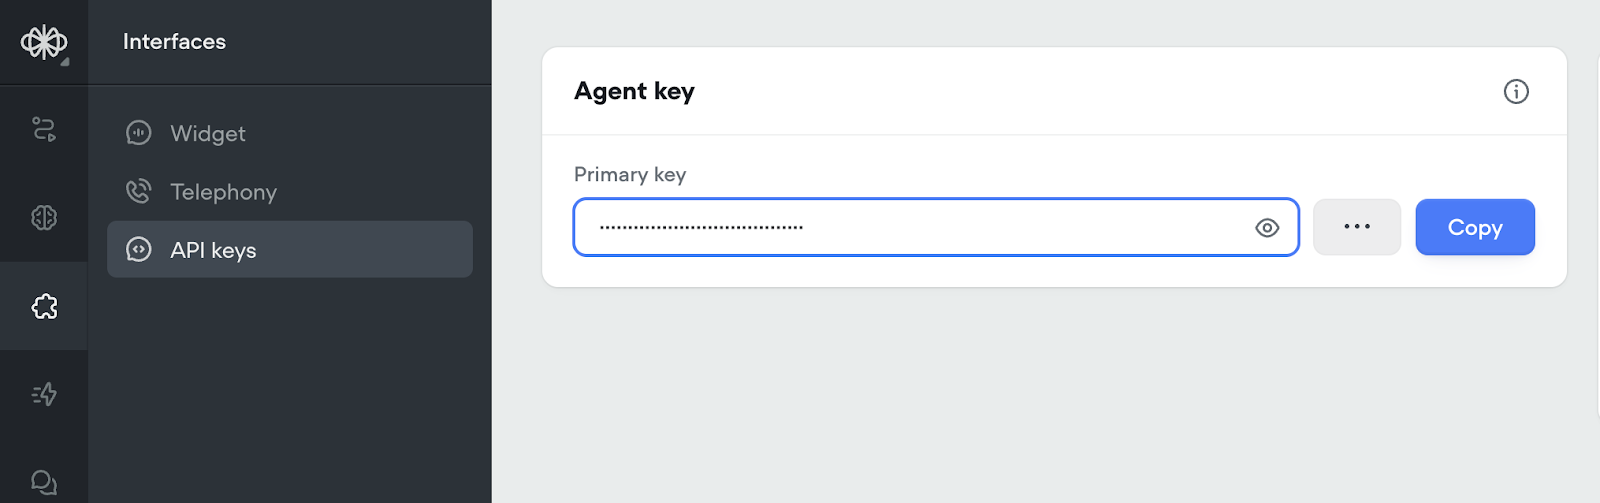
Copy and paste both values to Convocore and hit publish. Important - don’t forget to publish, or you’ll have to repeat the process.
{{blue-cta}}
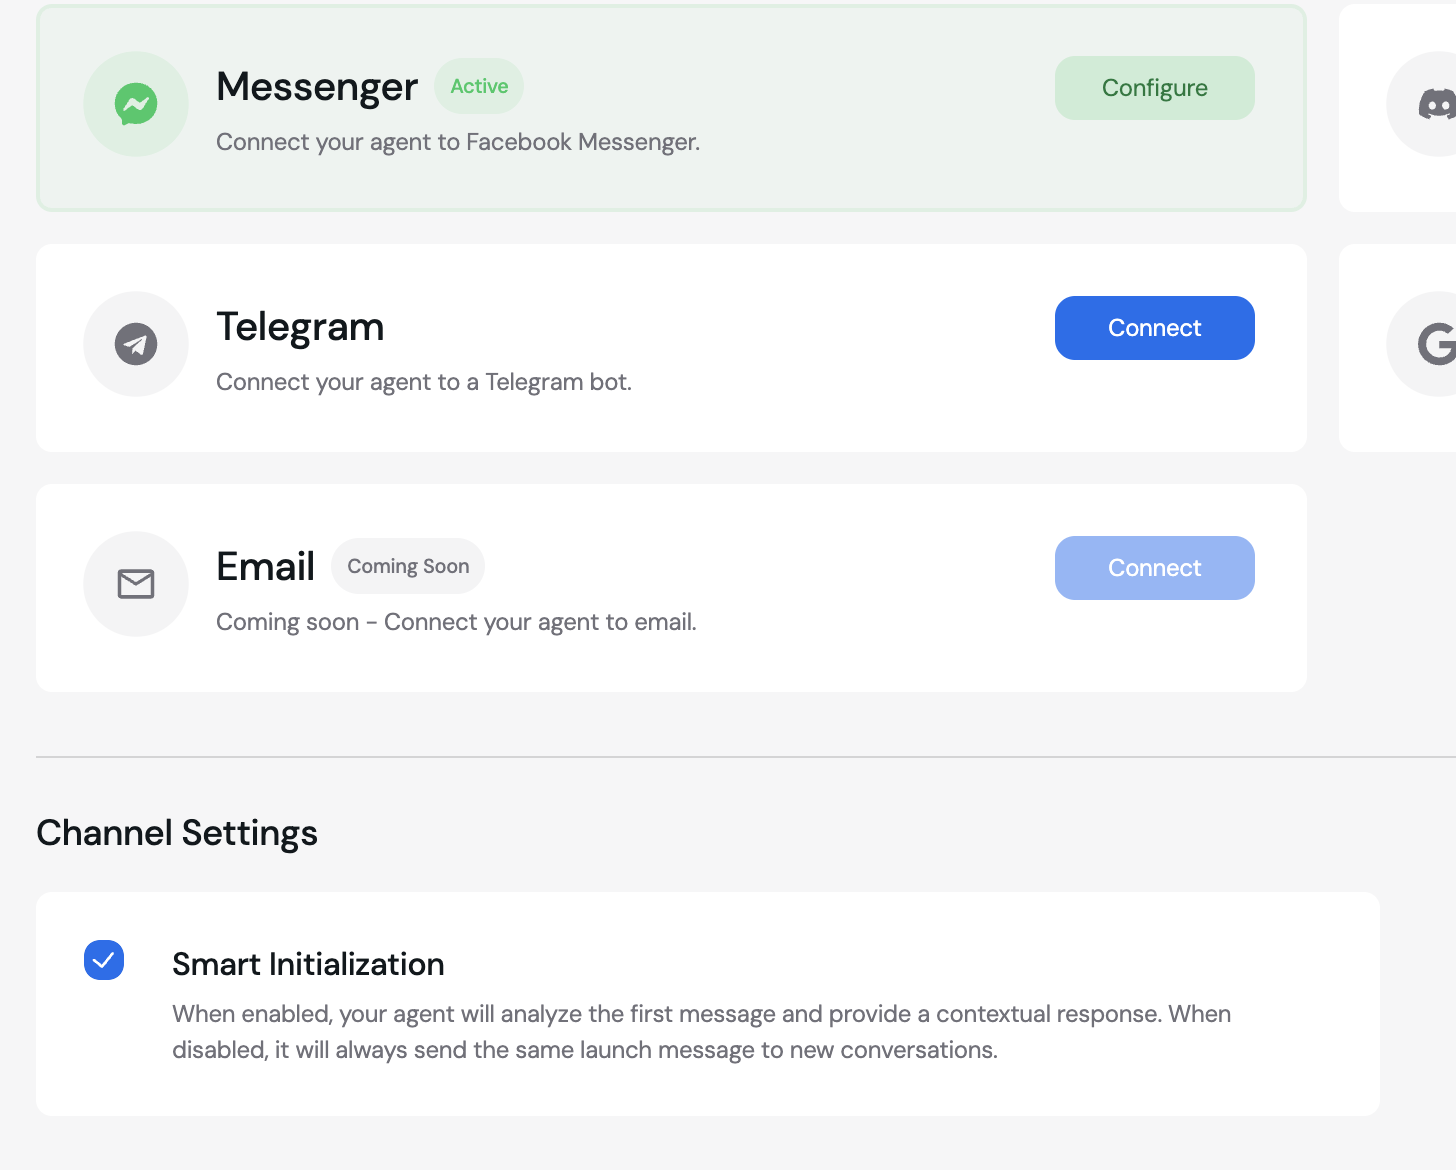
We’re almost done with the integration. The final step is to connect Convocore with Facebook Messenger. Go to the Channels tab and click “Connect” next to Messenger (Image 8). A popup will appear—simply click “Continue with Meta.” You’ll then need to log in to your business Facebook account. This direct login allows the Convocore Meta app to connect to your Facebook page, so you can grant access to automate your business messages.

Here are the steps to finalize the integration with your your Facebook page:
In the end, you should see the facebook assets that the app has access to. If you selected one business, you’ll see one card, you selected more than one, you’ll see multiple cards. Press “continue” to finish the integration with your facebook business account (Image 9).

That’s it—congratulations! Messenger integration is now live. If everything was set up correctly, the Messenger card should be glowing green (Image 10). Try it out by sending a message to your business page.
Note: By default, each message sent using the Convocore app is treated as a separate conversation with no history. This means the bot won’t remember previous messages. To fix this, enable Smart Initialization (Image 10) at the bottom of the Channels tab and click “Publish.”
I also highly recommend reading the Meta developer docs—they mention that some countries require you to disclose to users that they are interacting with a bot. It’s a very short read, you’ll find the information under the heading “Informing Users About Your Automated Experience” in: https://developers.facebook.com/docs/messenger-platform/send-messages/
Thanks to Convocore, integrating Voiceflow with Facebook Messenger was a breeze. We can now focus on building out our agent using.
In this next step, we’ll focus on prompt engineering basics—how to write clear, effective instructions for your AI agent so it can deliver real value to users.
I’ll be honest - at the beginning of my AI development journey, I saw prompt engineering as something that people say to sound smart. But after spending more than 2 years working with Large Language models, a good written prompt and a correct model picked for your use case can be like night and day. Do not overlook this, spend time learning about best practices in prompt engineering.
If you want to dive deeper and learn how to prompt your agents or how to structure your prompts when working with LLMs, I recommend reading OpenAI's cookbook - https://cookbook.openai.com/examples/gpt4-1_prompting_guide
Here are essentials for any AI Agent prompt:
The more you think about likely user questions and situations, the better you can tailor your instructions for the AI. For example, instructions for a Messenger bot should prioritize brevity and fast replies, while a website chat might allow for longer answers or richer formatting. Each scenario might require its own tweaks to make sure the AI gives spot-on answers every time.
So before finalizing your prompt, spend a bit of time thinking through the main scenarios for your business. A little extra effort here makes your agent much more effective—and means fewer headaches down the line.
You can review your agent prompt by clicking on the first block in your Voiceflow canvas and clicking “Edit agent” (Image 11).

In our example, we’re using the system prompt as our main knowledge base. This works perfectly if you only offer a few coaching programs or services—just add your key selling points, common questions, and typical objections right into the prompt.
If your business has a lot more information, products, or handles a wide range of questions, you’ll want to set up a dedicated knowledge base instead. For now, this simple approach will get you started fast.
If you want to learn how to properly set up a scalable AI knowledge base, check out how to build an AI insurance agent.
Here is how my final prompt looks like:
You’re FitLife’s fitness coach. Help users with programs, training, nutrition, and signing up for coaching. Your name is Alan.

## How to answer:
* Keep replies short—1 to 3 sentences, Messenger style.
* Be friendly, motivating, and direct.
* If you don’t know something, say so—don’t guess.
* Never give medical advice—refer to a healthcare professional.

## Conversation style:
* Greet quickly, then answer.
* Focus on the user’s question, skip long intros.
* Suggest next steps if it fits (example: Want details on 1-on-1 coaching?).
* Show enthusiasm for achievements, empathy for struggles.

## 1-ON-1 COACHING PROGRAM
- Price one payment of 999$ or 3 payments per month of 333$

**Selling Points:**
- Fully personalized workout plans tailored to your goals, fitness level, and schedule
- Weekly check-ins with your dedicated coach for accountability and adjustments
- Custom nutrition guidance without restrictive dieting
- 24/7 messaging support for questions and motivation
- Progress tracking with monthly assessments
- Flexible scheduling that works around your life

**Common Objections & Responses:**

*"It's too expensive"*
→ "I understand the budget is important. Think of it as an investment in your health that pays dividends for life. Our coaching costs less than a daily coffee and includes personalized attention you won't get at a gym. Plus, we offer flexible payment plans."

*"I don't have time"*
→ "That's exactly why our program works! We design workouts that fit YOUR schedule - even 20-30 minute sessions can be incredibly effective. Many clients say coaching actually saves them time by eliminating guesswork."

*"I can find free workouts online"*
→ "You're right, there are free workouts everywhere. But without personalization, accountability, and expert guidance, most people struggle to see results. Our coaches ensure you're doing the RIGHT workouts for YOUR body and goals, safely and effectively."

*"I'm not fit enough yet"*
→ "That's the perfect time to start! We specialize in meeting you exactly where you are. Many clients start as complete beginners. Your coach will ensure every workout is appropriate for your current fitness level."

## SAFETY RAILS
- **Stay in your lane**: Only discuss fitness coaching, our programs, and general fitness topics. Redirect off-topic questions politely.
- **No medical advice**: Never diagnose, prescribe, or give medical opinions. Always say: "Please consult with a healthcare professional for medical concerns."
- **Don't invent details**: Never make up prices, program features, schedules, or policies. If it's not in the knowledge base, don't guess.
- **Admit limitations**: Use phrases like "Based on the information I have..." or "I can only share what's in our knowledge base."
- **No comparisons**: Don't discuss or compare with other fitness coaches or gyms unless that information is explicitly in the knowledge base.
Note: Since we're using a social media channel for our interactions, users don't usually expect answers within seconds. This allows us to use reasoning models (if you're on a paid tier of Voiceflow), which are typically smarter and less expensive than fast models like GPT-4.1 or Sonnet. You can review your options in prompt settings, after opening your agent block (Image 12).

After updating your prompt settings, you should publish your Voiceflow agent once again for changes to appear.
{{blue-cta}}
Now that your Facebook Messenger bot is up and running and the AI agent prompt is finished and published, try asking it a few questions—see how it responds based on our prompt and setup. Here are some examples from the agent we built in this guide (Image 13).

Take a minute to test it out—ask a few sample questions and see how the agent responds based on the prompts and setup you just created.
Congrats, you have successfully built out your Facebook bot that can answer questions 24/7.
You can download the Voiceflow template here.
Want to take your Messenger bot further?
If you’re ready to scale beyond simple Q\&A, explore our step-by-step blogs on more advanced topics:
These guides show you how to set up Retrieval-Augmented Generation (RAG), connect custom data, and integrate business features like lead capture—so your bot becomes a true business tool, not just a Q\&A widget.
Need a working Facebook Messenger solution, fast?
If you want a Messenger bot built for your business (with all the tech handled for you), book a call with us - https://www.parnidia.com, We’ll develop and launch your solution—so you can focus on results, not code.
Happy building!


.avif)
.avif)