Imagine this: A customer sends an email to your support team asking about your business hours. Within seconds, they receive a perfectly crafted response, complete with accurate information and a friendly tone. No human agent has touched the ticket, yet the customer’s query is resolved instantly.
In this step-by-step guide, we will guide you through the process of implementing an AI agent to solve Zendesk tickets, potentially saving your support team countless hours and improving the overall customer experience. We'll explore how to leverage Voiceflow, Make (formerly Integromat), and Zendesk's API to create an automated support workflow.
Why Should You Automate Zendesk Ticket Resolution?
With increasing customer demands, your support team can quickly become overwhelmed by repetitive tasks. Here’s why automating customer support can help your business save time and money:
Reduce Response Times: Automated responses can significantly reduce the time it takes to address customer inquiries. By 2025, AI is expected to power 95% of customer interactions, enabling companies to handle routine inquiries promptly and efficiently.
Increase Efficiency: AI-driven customer service not only improves efficiency but also reduces operational costs. Over half of the companies using AI in their customer service have reported reduced costs due to increased efficiency and faster issue resolution.
Consistency: Automated responses ensure consistent and accurate information delivery to customers. With AI handling up to 70% of customer requests, businesses can maintain high levels of service consistency across interactions.
Cost-Effective: Automating routine tasks reduces the need for extensive human resources, lowering operational costs. In fact, AI has enabled many companies to save significantly on staffing costs while improving service quality.
How to Build an AI-Powered Agent for Zendesk
To streamline customer support operations and enhance ticket resolution workflows, we’re setting up an integration between Zendesk, Make.com, and Voiceflow. The goal is to intelligently automate responses to new support tickets by combining Zendesk’s robust help center capabilities with Voiceflow’s advanced AI and conversational automation features. This setup leverages Make as a middleware platform because Zendesk’s native triggers are not capable of issuing the two sequential API calls required to engage Voiceflow—first initiating a launch request and then sending a user message via a text request. By using Make, we unlock the flexibility to orchestrate these calls and automate intelligent triage processes.
This integration allows us to take full advantage of the AI features Zendesk offers, while extending its functionality through Voiceflow’s generative AI. With Voiceflow, teams can design powerful conversational flows that answer customer questions, suggest help center articles, or escalate edge cases—reducing manual workload and improving customer satisfaction. Automatically routing support tickets to the right flows and responding with personalized, context-aware answers ensures faster resolutions, adherence to best practices, and scalable support operations. Whether you're looking to handle common customer questions or power your Zendesk AI help center with richer automation, this use case highlights how advanced AI systems like Voiceflow can transform support experiences end-to-end.
{{blue-cta}}
1. Understand the High-Level Workflow
When a new ticket comes into Zendesk, a trigger fires off.
This trigger sends a payload containing the ticket ID across to Make.com.
Make.com receives the payload and sends it across to Voiceflow.
Your AI agent built in Voiceflow processes the request and solves the ticket.
Voiceflow updates the ticket in Zendesk with the response and potentially adds tags.
2. Set up Your Voiceflow AI Agent
Go into Voiceflow and create a new assistant.
The first step should be to capture the payload sent from Make.com. This payload contains the ticket ID.
Save the captured ticket ID into a variable, for example, named ticket_id.
3. Call the Zendesk API to Get Ticket Details
Add an API step to your Voiceflow canvas.
Set the method for this API call to GET.
The URL for getting ticket details: https://{your_zendesk_subdomain}.zendesk.com/api/v2/tickets/{ticketId}
Add the necessary Headers:
Content-Type with value application/json.
Authorization with value Basic {base64_encoded_api_token}.
To get the Base64 encoded API token:
Go to your Zendesk Admin Center.
Search for "API" and click on "Zendesk API".
Ensure Token access is enabled.
Click "Add API token".
Give it a name (e.g., "Zendesk Make integration").
Copy the generated API token.
Click save.
Use an online Base64 encoder.
Paste the format email_address/token:api_token into the encoder.
Replace email_address with your email address and api_token with the token you copied from Zendesk.
Encode and copy the encoded value.
Paste this encoded value into the Authorization header in Voiceflow, ensuring it's preceded by Basic.
Test the API call in Voiceflow:
Choose a random ticket ID from Zendesk, paste it into the test field, and click generate.
You should receive a successful response containing ticket information.
4. Capture Zendesk Ticket Data into Variables
After a successful API call, use the Capture Response feature within the API step:
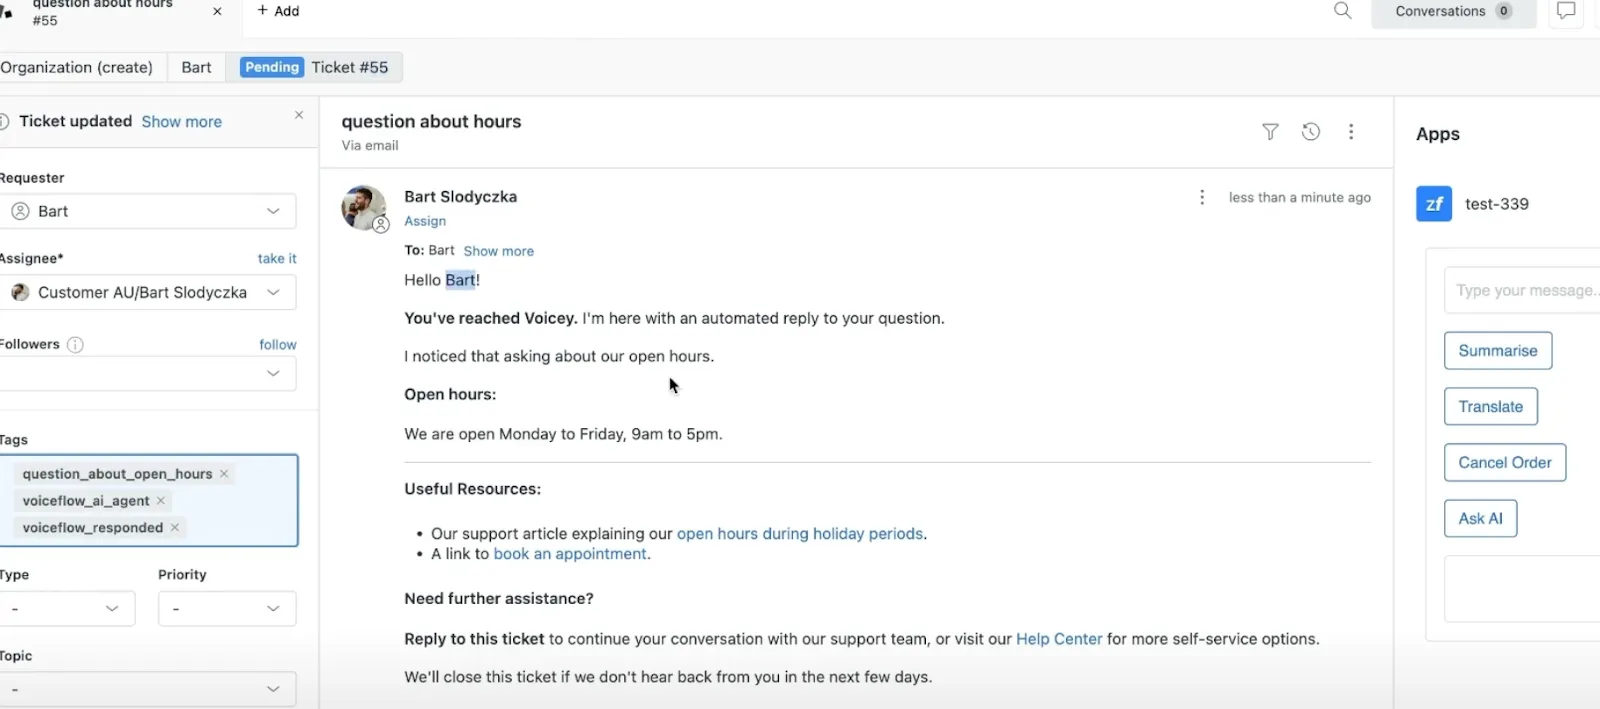
Confirm the ticket is updated with the Voiceflow response.
Check for added tags (e.g., voice_flow_ai_agent, question_about_open_hours).
Look for the automated email response in your inbox.
This walkthrough covers the process described in the source for connecting Zendesk, Make, and Voiceflow to automate responses for new tickets. Focus on building more specific answer flows and filters in Voiceflow as you expand your AI agent’s capabilities.
{{blue-cta}}
How to Fine-Tune Your AI Agent for Customer Support
With the basic setup complete, it's time to put your AI agent to the test. Send a variety of test emails to your Zendesk support address and monitor how they're processed. Review the AI-generated responses for accuracy and appropriateness, and adjust your Voiceflow logic as needed.
As you refine your system, gradually expand the range of inquiries your AI agent can handle. Implement more sophisticated classification methods, add support for multiple languages if necessary, and consider A/B testing different response styles to optimize customer satisfaction.
Build Your AI Agent to Solve Zendesk Tickets Automatically Today
With Voiceflow's user-friendly platform, you can start building your AI support agent for free, joining over 250,000 teams who already trust our platform. Click on the Get Template button now to start building!